Prerequisites
In order to allow the post function to work properly, ensure to enable the Approval History by navigating on
Manage apps → Global Configuration → Approval History → Enable Approval History

Configuring Add Approval Summary post function
Follow the steps below to setup the Add Approval Summary post function on a workflow transition:
- Choose
 → Issues → Workflows, or click Create Workflow Function on the Advanced#Workflowfunctions administration screen
 - Edit the concerned workflow
- Select the concerned workflow transition (transition on approbation or transition on rejection)
- Select the Post Function tab
- Add Post Function
- Check the option Add Approval Summary

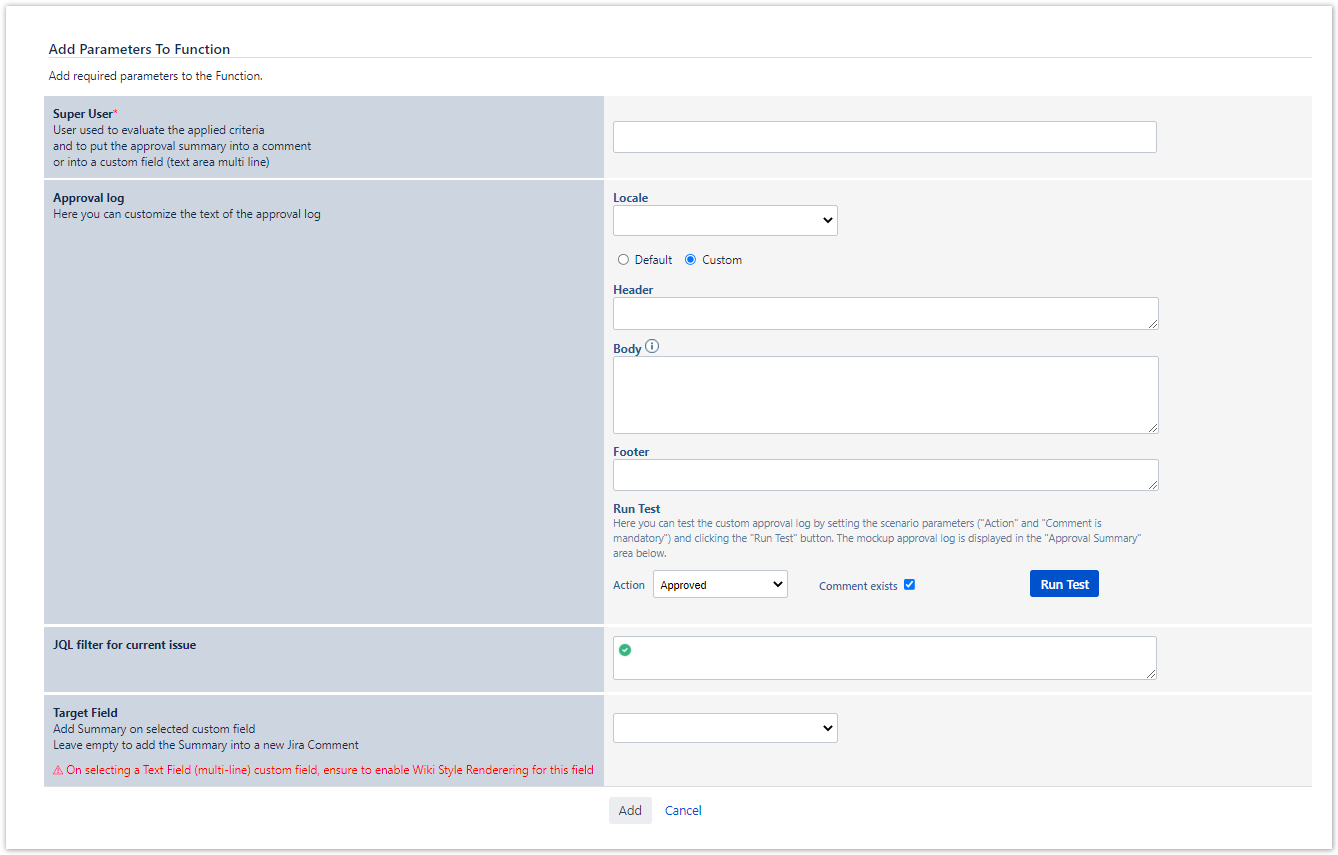
- Fill the parameters:
Super User (Required) - User used to evaluate the applied criteria and to put the approval summary into a comment or into a custom field (text area multi line):
The specified JQL Filter will be evaluated basing on the selected user. Ensure that the selected user has appropriate browsing permission on the projects to whom the current issue belongs to.
- The Jira Comment will be added via the selected user credentials.
- The Custom field will be edited via the selected user credentials.
- Approval Log (Optional) - Customize the text of the approval log: here you can customize Approval Summary (see How to Customize the text of the approval log). If this field is not filled, the default option is used.
The default Approval Summary Comment appears as follows: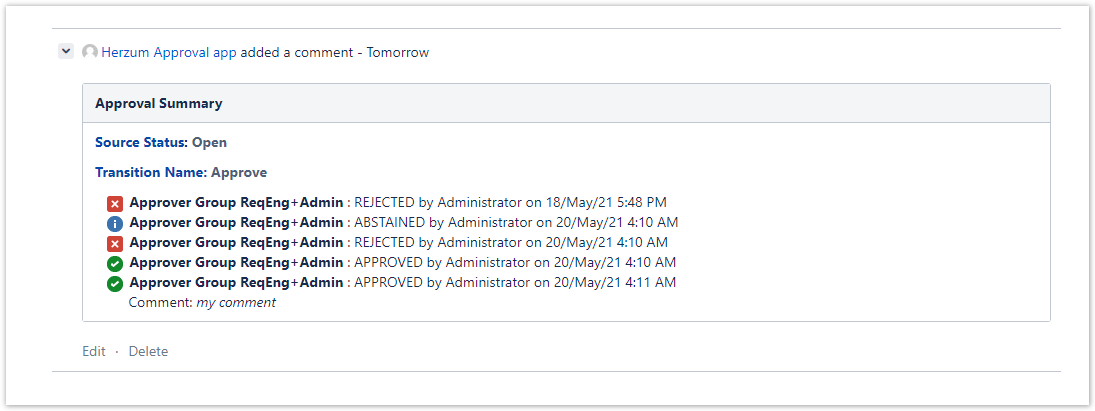
- JQL filter for current issue (Optional): the post function will act only if the current issue satisfies the JQL filter.
- Target Field - Add Summary on the selected custom field (Optional): When filled, the Approval Summary will be put on the selected custom field. Leave empty to add the Summary into a new Jira Comment on the current Issue.
![]() When selecting a Text Field (multi-line) custom field, ensure to enable Wiki Style Rendering for this field
When selecting a Text Field (multi-line) custom field, ensure to enable Wiki Style Rendering for this field
Example - On setting a target custom field, this field will be filled as follows:

![]() In order to allow the post function to work properly, remember to keep it on the top (prior to Set issue status to the linked status of the destination workflow step).
In order to allow the post function to work properly, remember to keep it on the top (prior to Set issue status to the linked status of the destination workflow step).
![]() You can add the post-function on any transition.
You can add the post-function on any transition.
![]() The Approval Summary is filled only if the Approval History of the issue is not empty.
The Approval Summary is filled only if the Approval History of the issue is not empty.
![]() The Approval Summary is filled with the latest approval decision for each mapping applied on the issue identified by its Source status and transition on approbation.
The Approval Summary is filled with the latest approval decision for each mapping applied on the issue identified by its Source status and transition on approbation.
How to Customize the text of the approval log
You are able to Customize the text of the approval log as described below.
Select a Locale to translate the logged Actions (Approved, Rejected, Abstained, Reset) basing on the Language pack translations associated to the selected Locale.

Select the option Custom in order to set up:
- Approval Summary Header: insert a Wiki text on the top of the page
- Approval Summary Footer: insert a Wiki text on the bottom of the page
- Approval Summary Body: insert a text that follows the convention described below:
Add a Conditional Tag (Optional) to evaluate the expression only if a specific condition (e.g.
<tag>expression</tag>) is met.
Allowed Tags are:TAG_IF_COMMENT = "ifComment";
TAG_IF_COMMENT_IS_FALSE = "ifComment isFalse";
TAG_IF_APPROVED = "ifApproved";
AG_IF_APPROVED_IS_FALSE = "ifApproved isFalse";
TAG_IF_REJECTED = "ifRejected";
TAG_IF_REJECTED_IS_FALSE = "ifRejected isFalse";
AG_IF_ABSTAINED = "ifAbstained";
TAG_IF_ABSTAINED_IS_FALSE = "ifAbstained isFalse";
AG_IF_PENDING = "ifPending";
TAG_IF_PENDING_IS_FALSE = "ifPending isFalse";
- Specify the expression by following the convention below:
add a text into the curly brackets { }
add any admissible issue field inside the squared brackets [ ]. Admissible fields are:"Approval Name", "Action", "Source Status", "Transition", "Approver", "Date", "Comment", "Destination Status", "Can Approve Detail", "MandatoryOptional"
concatenate each element via &
Example - {• Source Status: } &[Source Status]& {\\ } &{• Transition Name: }&[Transition]& {\\ } &{• "}&[Approval Name] &{" }&{: } &[Action]&{ by }&[Approver]&{ on }&[Date] & {\\ }
![]() You can have multiple conditional tags concatenated by '&'
You can have multiple conditional tags concatenated by '&'
Example -
{• Status: } &[Source Status] & {\\ } &{• Transition: }&[Transition]& {\\ }
&<ifComment>{• Approver Comment: } &[Comment]</ifComment>
&<ifComment isFalse>{• The Approver has not inserted any comment}</ifComment isFalse>&{\\}
&{• "} &[Approval Name] &{" }&{: }&[Action]&{ by }&[Approver]&{ il }&[Date] & {\\ }
Run Test
You are able to Review how the Custom Approval log will appear depending by:
- Action performed by the Approver (Approved, Rejected, etc.)
- Whether the Comment exists or not: If the Approval Comment was provided on performing an Approval Action, the condition <if Comment>..</ifComment> returns True.
