Add Mapping
Follow the steps below to create new Approval Mappings per selected Project and Issue Type
- Click Add Approval Mapping and fill the fields Project and Issue Type
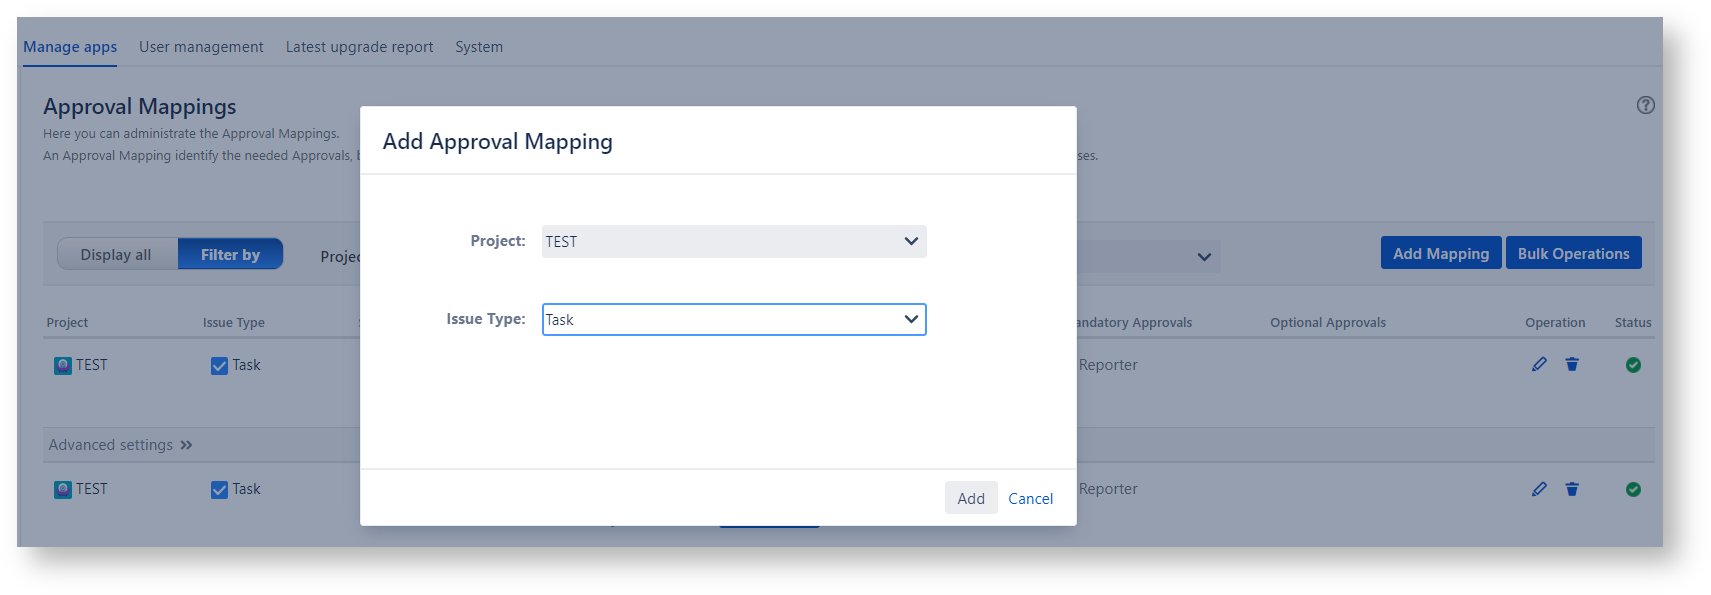
- Select a workflow transition and drag and drop the Available Approvals under the Requested Approvals column
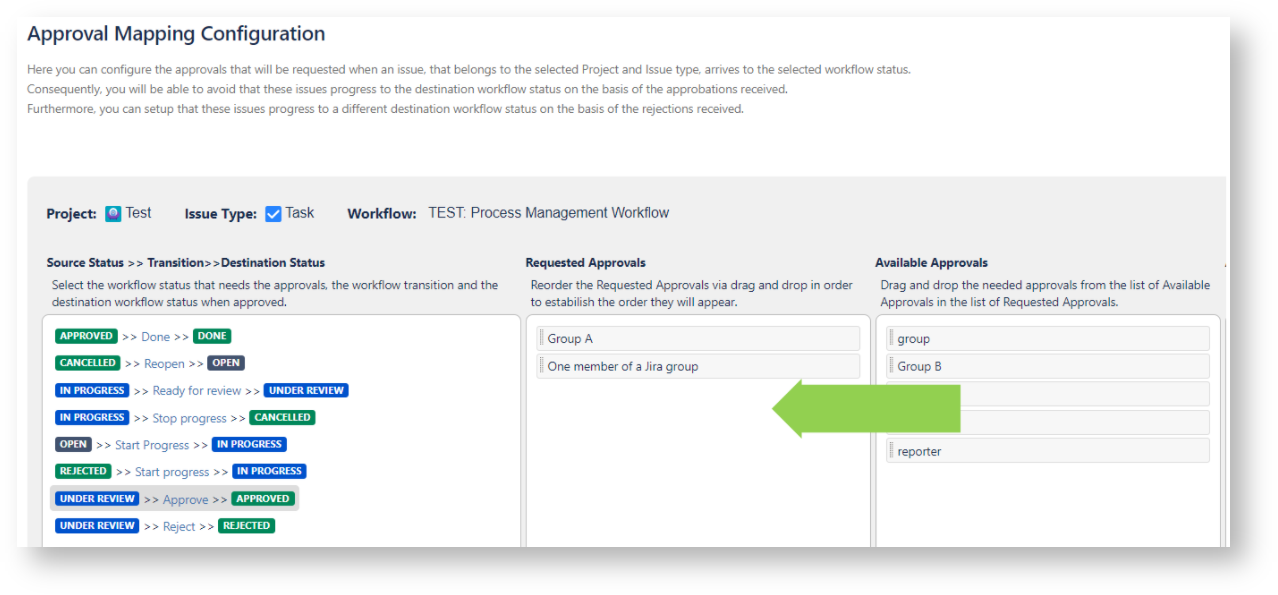
That done, you are able to setup Approval Mapping Advanced Settings on to choose another workflow transition to setup requested Approvals as explained above.
Advanced Settings
Automatic Workflow transition
The Setup Automatic workflow transition allows you to enable:
- the Automatic transitioning of the issue based on received approbations (by default All approbations)
- the Automatic transitioning of the issue based on received rejections (by default All rejections)
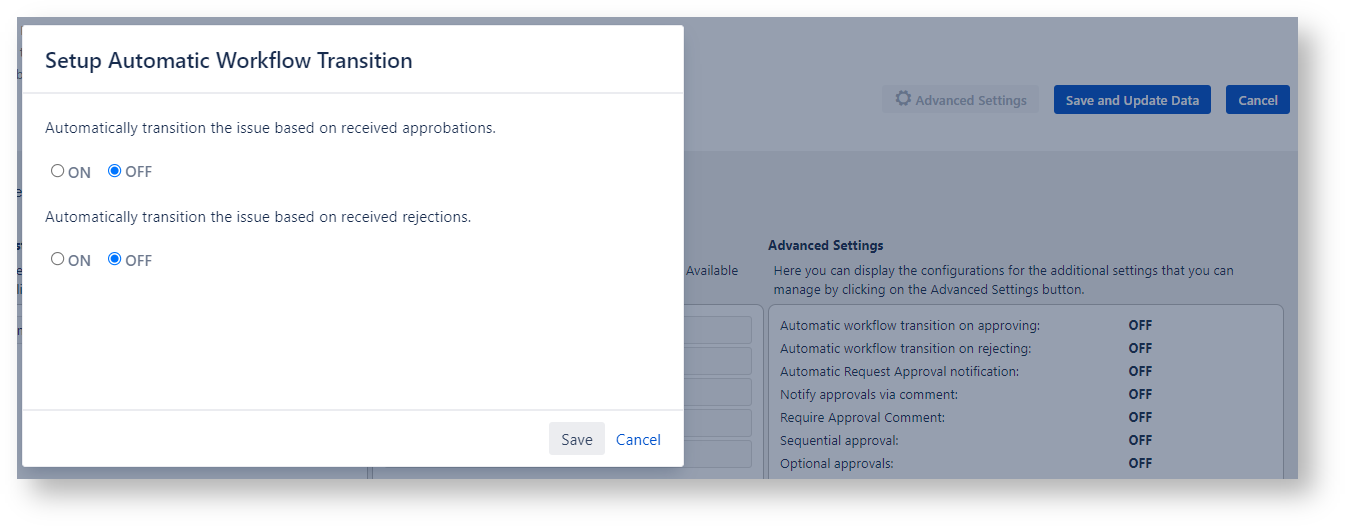
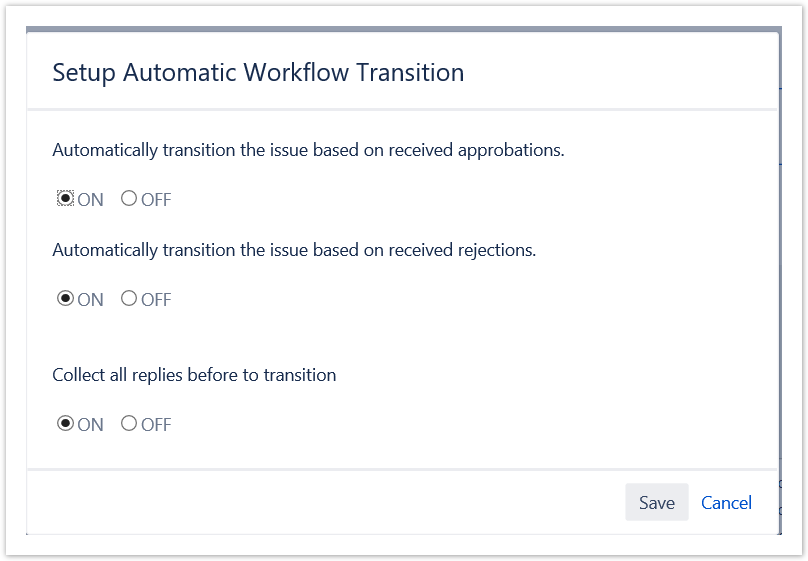
If the Automatic Transition on approbations and/or rejections is enabled then the option Collect all replies to transition appears in the panel-
This option allows to collect all replies before transition.
In other terms, the app will wait until all approvals get the vote before to transition the issue according to the minimum required approbations and rejections conditions that were configured.
Automatic Approval Request Notification via email
The Setup Automatic Approval Request notification screen allows to notify approvers automatically via email of a new pending approval request.
The notification is sent once when the issue moves in the selected Source Workflow Status.
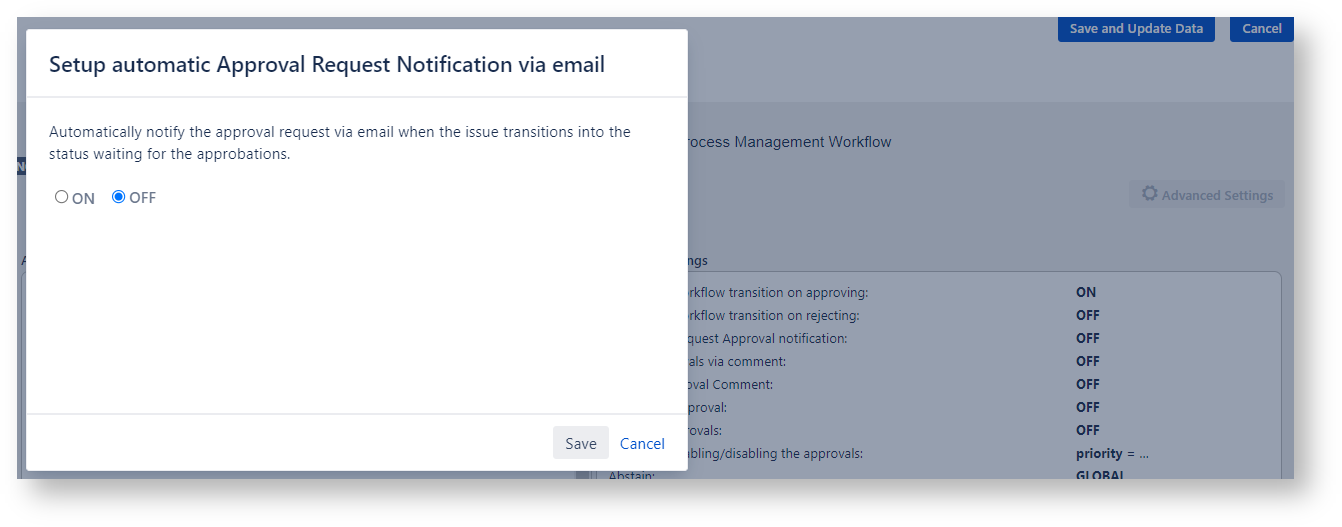
If you need to resend automatically the Approval Request email notification after an elapsed time you need to setup the Approval Request Email Automation advanced setting.
Notify approval via comment
The Setup Notify approval via comment screen allows to enable
- the automatic notification via comments of the approval request when the issue moves in the selected source status
- the approval reply via comment, so that the app processes added comments in order to trigger, when the comment is a valid response, the approval change of status

Require Approval Comment
The Setup Require Approval Comment screen allows to require that the approver inserts an approval comment to justify the approval decision.
This setting is effective for approval responses provided via email and via issue web panel.

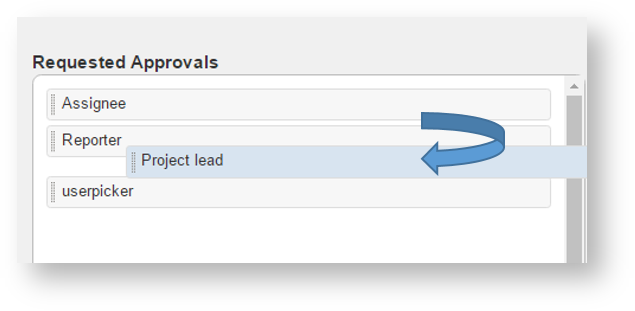
Sequential approval
Select Sequential Approval in order to enable the sequential approval.
It causes that the approval decision must be submitted in the order established on the requested approvals column.

You are able to establish the sequential order of the requested approvals via drag & drop:
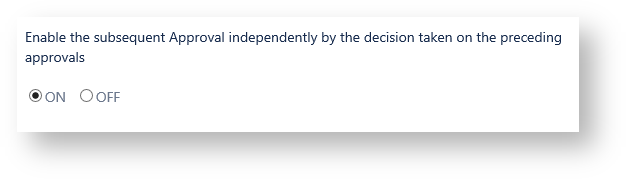
You can choose to submit for approval the subsequent approval independently by the response gets on the preceding approval or only case of it gets an approbation (Default).
You can choose that a user cannot change their decision if a subsequent user in the sequence has approved, rejected, or abstained.
The feature is available in Approval plugin version 6.7 and later.

Optional approvals
Select Optional Approvals in order to choose the Optional Approvals.
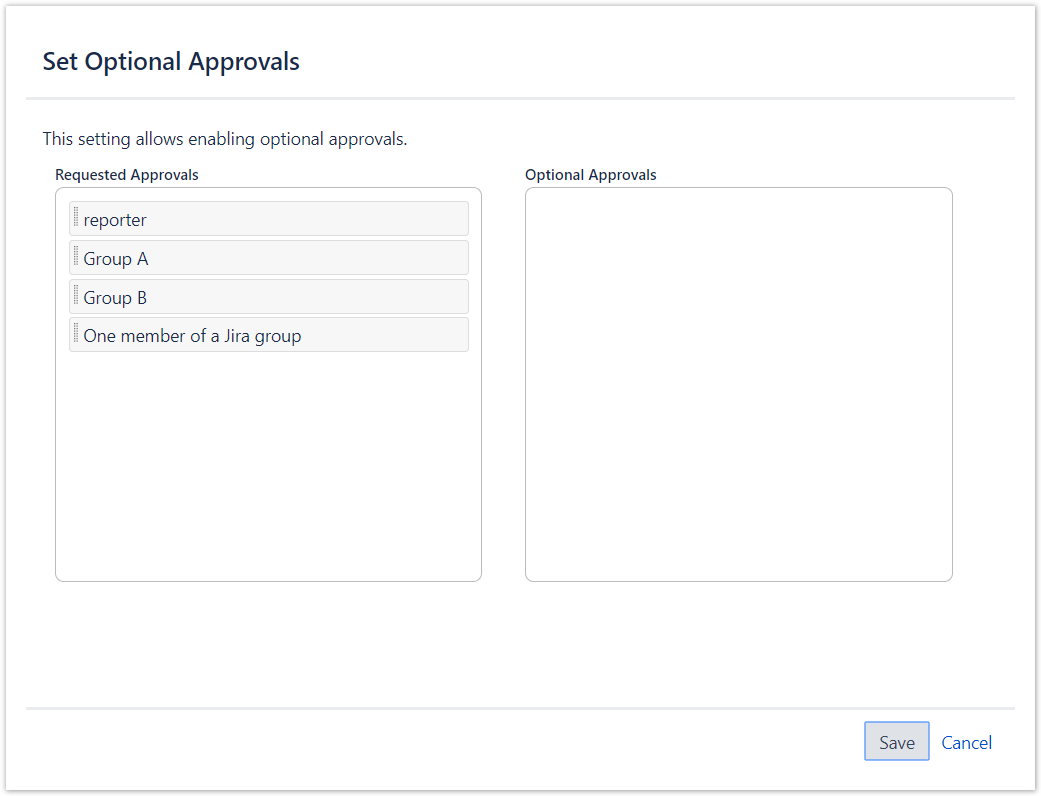
The Optional Approvals consist of particular Approvals that case of they don't get the vote, the Approval is not considered but if they get the vote, their vote is considered same than other to evaluate the result of the approval stage.
By Default All approvals are considered Mandatory.
If an issue requires at least one Optional Approval, the app behaves as described below:
- When the ‘Collect all replies before to transition’ is turned ON, the app expects to collect All Requested Approvals replies (with the exclusion of Optional Approvals replies) before to transition.
- When no ‘minimum required approbations/rejection (conditioned and unconditioned)’ exists,
- the app allows the transition only when All Requested Approvals (with the exclusion of Optional Approvals replies) have been approved/rejected
- When any ‘minimum required approbations/rejection (conditioned and unconditioned)’ exists, the app evaluates the available settings as follows:
- All,the app allows the transition only when All Approvals (with the exclusion of Optional Approvals that have not gotten any reply) have been approved/rejected
- Fixed Number, the app allows the transition only when the number of approvals has been reached (it includes either the optional and the mandatory approvals)
- Percentage, the app allows the transition only when the percentage of approbations allowing to transition has been reached ( the percentage is evaluated counting the mandatory approvals and the optional approvals having replied).
![]() E.g. Case of it's requested the 50% of approbations to transition, If the evaluation of the formula Count(approbations)/[Count(Requested Approvals)- Count (Optional Approvals) + Count (Replied Optional Approvals)] is >= 50%, the transition is unlocked.
E.g. Case of it's requested the 50% of approbations to transition, If the evaluation of the formula Count(approbations)/[Count(Requested Approvals)- Count (Optional Approvals) + Count (Replied Optional Approvals)] is >= 50%, the transition is unlocked.
![]() See also a customer use case implemented via this feature at: Capability to define a mixture of mandatory and optional approvers..
See also a customer use case implemented via this feature at: Capability to define a mixture of mandatory and optional approvers..
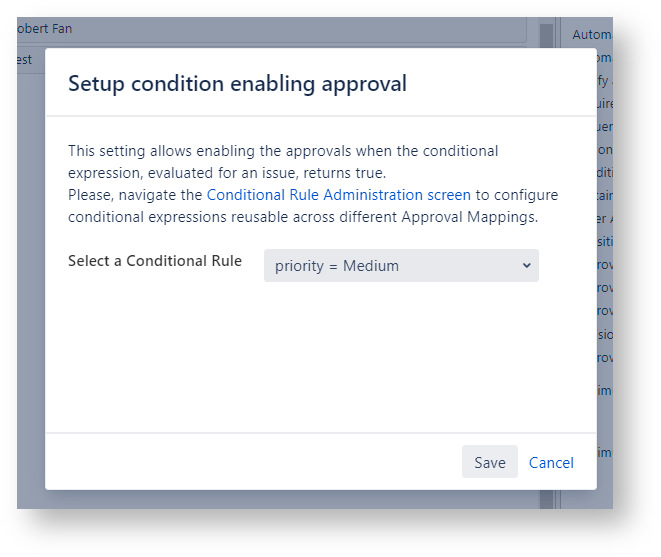
Condition enabling/disabling the approvals
Select Condition enabling/disabling the approvals in order to enable the approvals when the Conditional Rule, evaluated on the issue, returns true.
Actions
This option allows you to enable or disable the ability to reset or abstain.
The feature is available in Approval plugin version 6.7 and later.


Abstain
On enabling this option you allow to approvers to abstain from taking the approval decision.
An abstention is evaluated as an agreement to the decision taken by the votes of all the other approvers.
This setting overrides the Abstain Global setting.
If the option is set to Global the Abstain Global setting is applied.
This setting is applied in bulking operations.
Reset
Disabling this option does not allow approvers to reset their decision.
This setting overrides the Abstain Global setting.
If the option is set to Global the Abstain Global setting is applied.
This setting is applied in bulking operations.
This setting is not considered by the "Global Reset for super approvers" option.
The Actions option values ??are displayed in the general summary like this

If Abstain = OFF and Reset = OFF, the Approval web panel is shown like this

Global Reset for super approvers
Configure permissions for super approvers to reset approved, rejected, or abstained approvals to a pending state.
The feature is available in Approval plugin version 6.8 and later.

Let's assume we set this option to ON

Let's assume that
1) we have set this option to ON
2) we make user1 the super user via the Global configuration panel or the "Super Approvers" mapping option.
3) user1 logs in and views an issue where several users have expressed their decision.
In this scenario, the Approve panel displays a "Reset" button, which super user1 can use to reset all decisions.

After clicking the Reset button

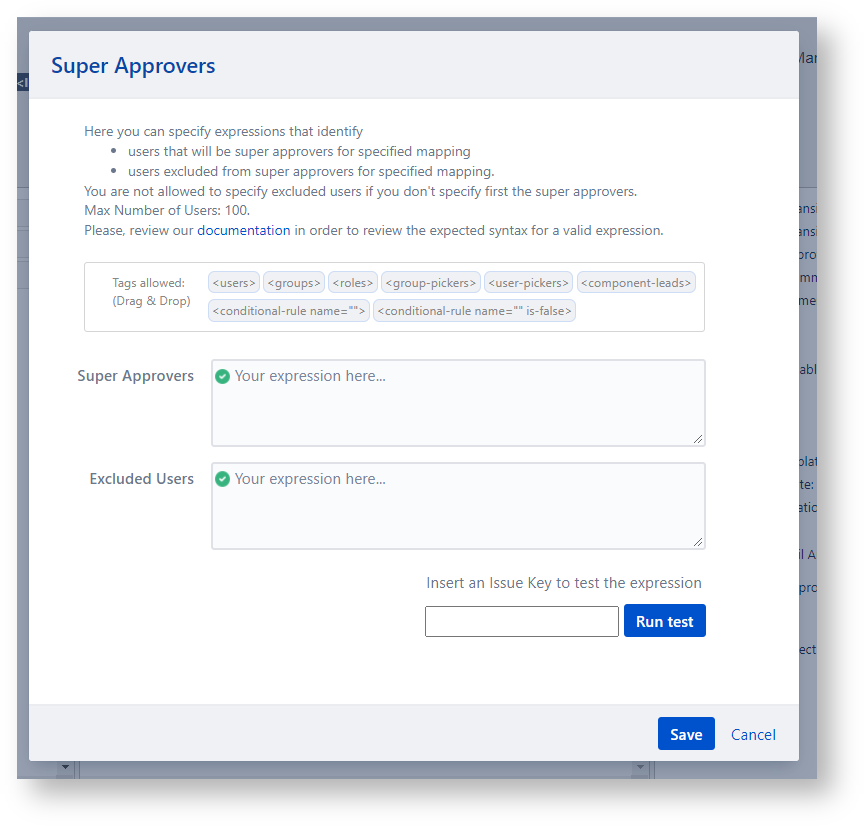
Super Approvers
Select Super Approvers in order to Setup expressions identifying the Super Approvers.
Transition on rejecting
Select Transition on rejecting in order to select the transition to perform on rejecting.
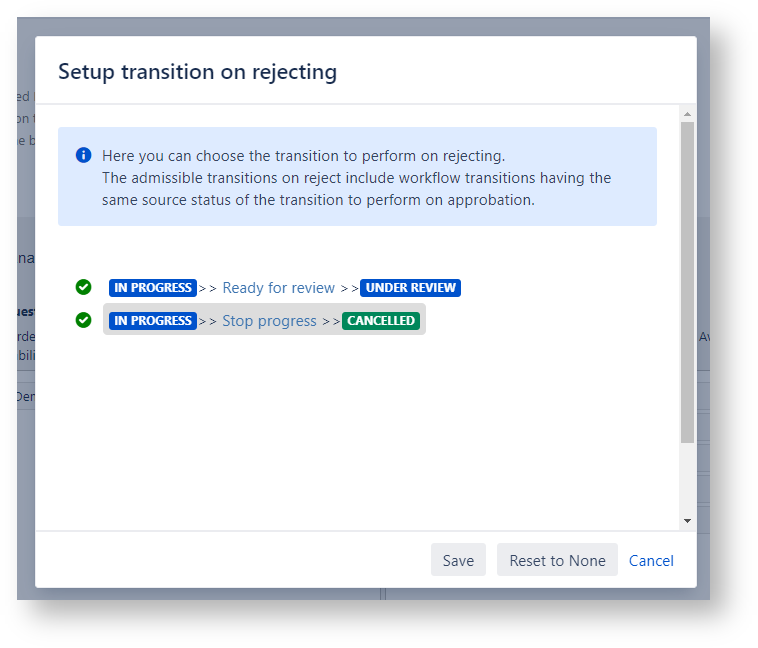
![]() In order to transition the issue on the selected Transition on Rejecting you must enable the Automatic Workflow Transition on rejection.
In order to transition the issue on the selected Transition on Rejecting you must enable the Automatic Workflow Transition on rejection.
E-Mail Templates
Select the E-Mail Templates option in order to to choose the email templates to apply when notifying the Approval Request and an Approval Reply emails.
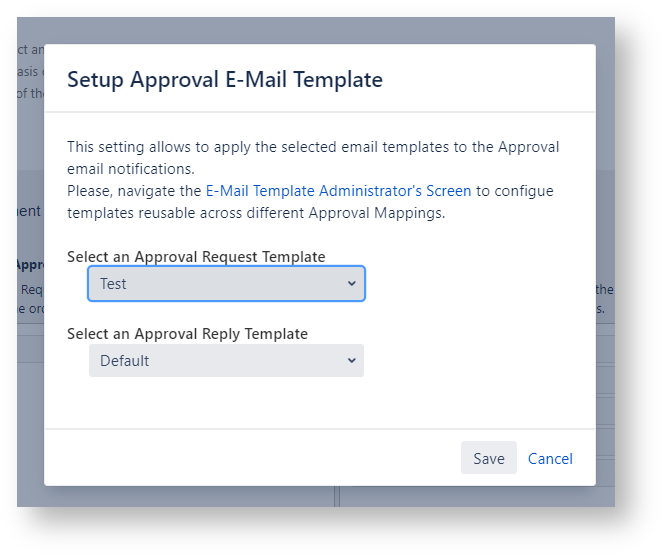
![]() If you do not select any template, the default template will be used to generate the email.
If you do not select any template, the default template will be used to generate the email.
Approval Reply Notification Scheme
Select the Approval Reply Notification Scheme option in order to to choose the Approval Reply Notification Schema to apply when notifying the Approval Reply emails.
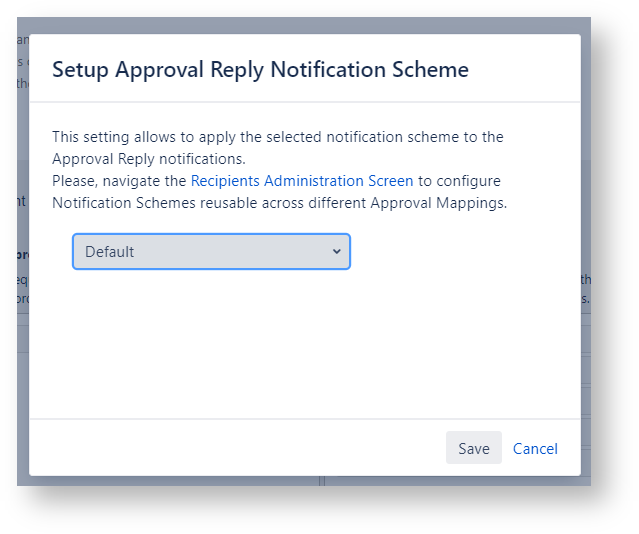
![]() If you do not select any notification scheme, the default notification scheme will be used to evaluate the recipients of the Approval Reply email.
If you do not select any notification scheme, the default notification scheme will be used to evaluate the recipients of the Approval Reply email.
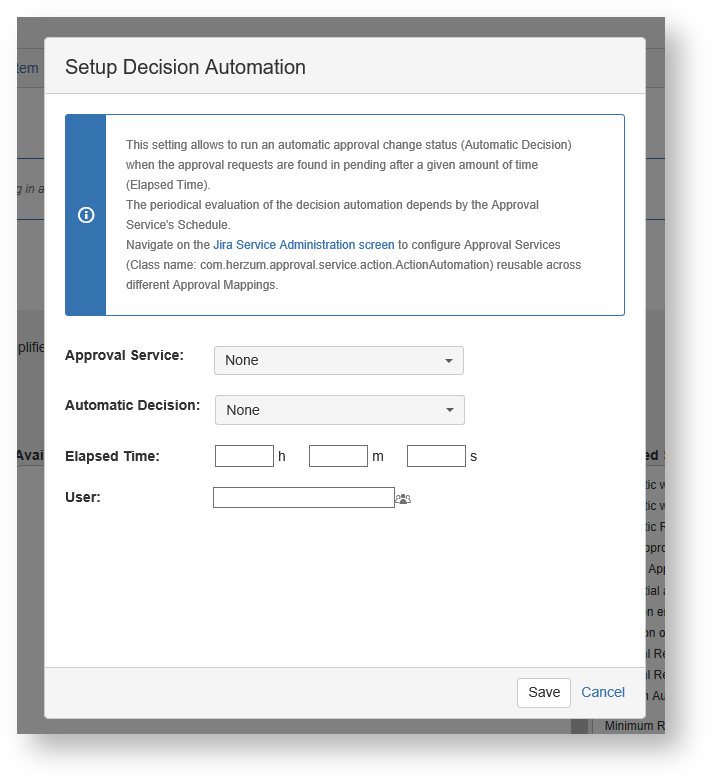
Decision Automation
Select Decision Automation to allow an automatic approval change status (Automatic Decision) when the approval requests are found in pending after a given amount of time (Elapsed Time).
The automatic decision will be traced as performed by the selected user.
Approval Request Email Automation
This setting allows to run automatic email reminders when an approval is still in pending after the specified amount of time (Elapsed Time) that has passed between the current data/time and latest notification data/time (when applicable) or the approval’s submit date/time.
![]() The Submit date is considered on behalf of the latest Notification Date only case of the Approval Request was never notified.
The Submit date is considered on behalf of the latest Notification Date only case of the Approval Request was never notified.
In addition, you are able to select (optionally) a Date Field chosen from a list including the Due Date and each existing Data picker custom field.
The value on the Data field, on the concerned issue, when specified, will establish the start date for running the automatic email reminders.
The Skip Notification field, when specified, will establish if the app must run automatic email reminding basing on the evaluation of the selected Conditional rule.
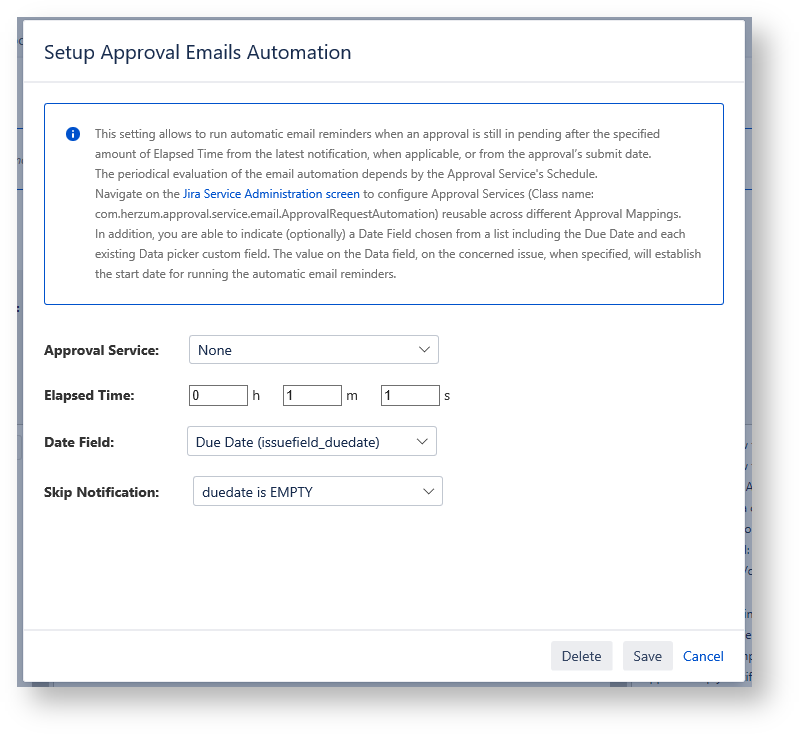
Offset
When a value is entered in the "Date Field" field, the "offset" field appears, through which you can specify the number of days to add or subtract from the date in the custom field. (This feature is available in Approval plugin version 6.6 and later).

Algorithm description
Algorithm description
- Case of the custom field is not defined →
- if Skip Notification is not filled with a Conditional Rule → The notification is sent based on elapsed time setting
- if Skip Notification is filled with a Conditional Rule →
- If the Conditional Rule evaluated on the current issue returns False → The notification is sent based on elapsed time setting
- If the Conditional Rule evaluated on the current issue returns True → The notification is not sent
- Case of the custom field is defined but, on the issue, it is not filled with a value →
- if Skip Notification is not filled with a Conditional Rule → The notification is sent based on elapsed time
- if Skip Notification is filled with a Conditional Rule →
- If the Conditional Rule evaluated on the current issue returns False → The notification is sent based on elapsed time setting
- If the Conditional Rule evaluated on the current issue returns True → The notification is not sent
- Case of the custom field is defined and it is filled with a value for the issue
- If current date<custom field date → The notification is not sent
- If current date>=custom field date
- If notification Date >= custom field date
- If current date - notification Date>=elapsed time →
- if Skip Notification is not filled with a Conditional Rule →
- The notification is sent (It implies that you will not need to update the data field to resend new notifications)
- if Skip Notification is filled with a Conditional Rule →
- If the Conditional Rule evaluated on the current issue returns False → The notification is sent
- If the Conditional Rule evaluated on the current issue returns True → The notification is not sent
- if Skip Notification is not filled with a Conditional Rule →
- If current date - notification Date<elapsed time → The notification is not sent
- If current date - notification Date>=elapsed time →
- If notification Date < custom field date →
- if Skip Notification is not filled with a Conditional Rule → The notification is sent
- if Skip Notification is filled with a Conditional Rule →
- If the Conditional Rule evaluated on the current issue returns False → The notification is sent
- If the Conditional Rule evaluated on the current issue returns True → The notification is not sent
- If notification Date >= custom field date
- If current date>=custom field date
The periodical evaluation of the email automation depends by the Approval Service's Schedule.
Navigate on the Jira Service Administration screen to configure Approval Services (Class name: com.herzum.approval.service.email.ApprovalRequestAutomation) reusable across different Approval Mappings.

![]() Some examples of customer scenarios that have been implemented using this feature can be reviewed at:
Some examples of customer scenarios that have been implemented using this feature can be reviewed at:
- Automate resending the Approval Request email notification after an elapsed time
- Approval Emails Automation
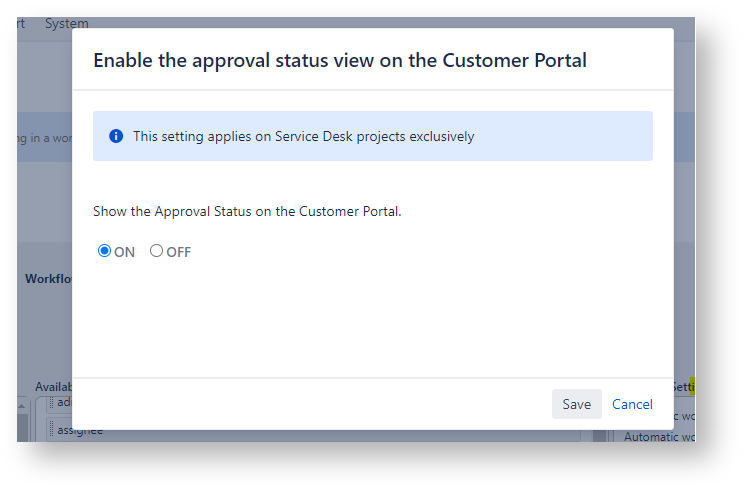
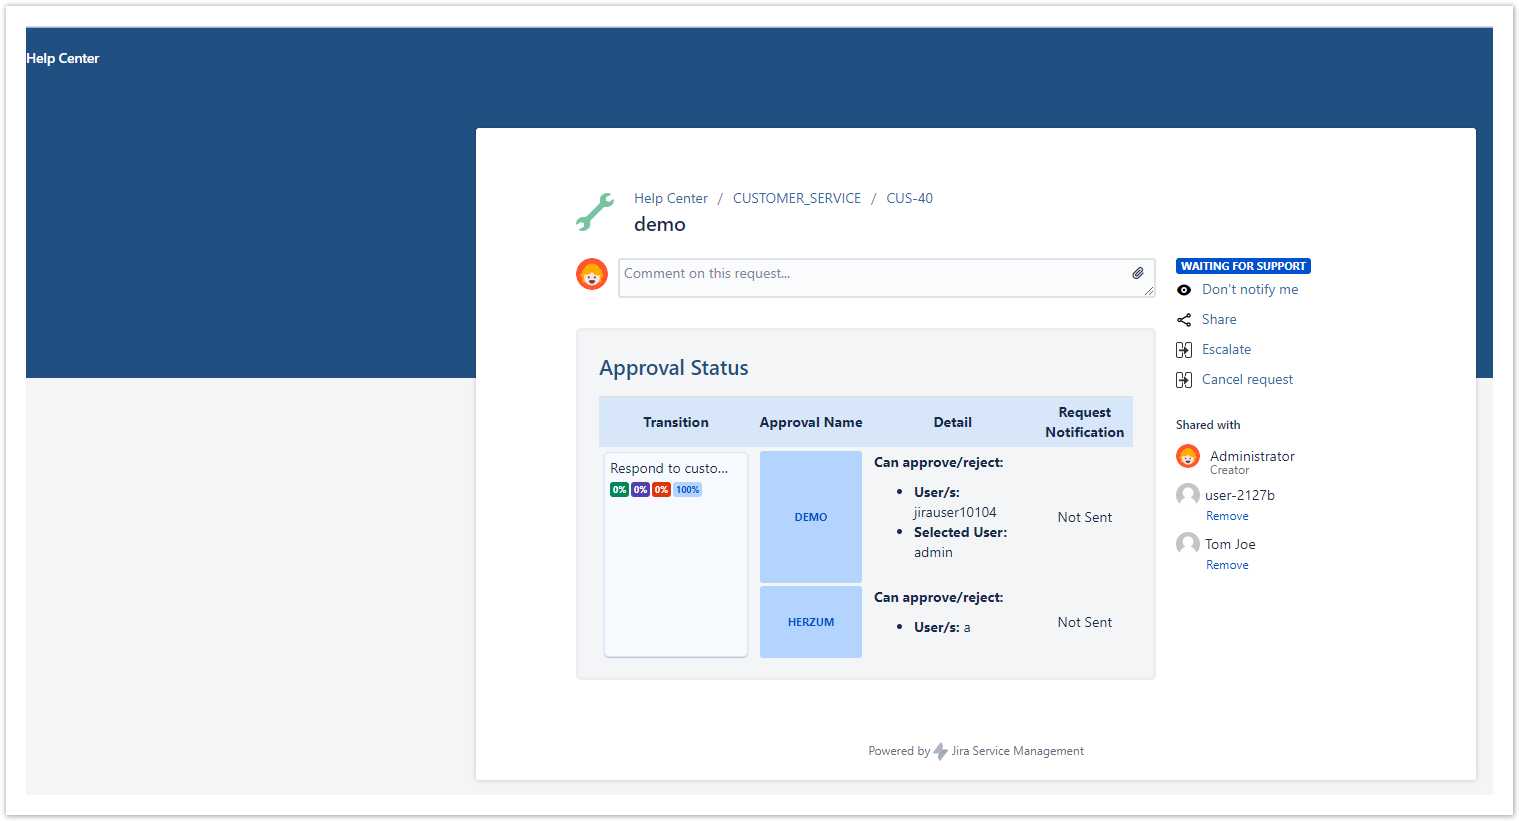
Approval Status shows on Customer Portal
This setting allows to enable the approval status view on the Customer Portal:
Example
Approval Buttons show on Customer Portal
This setting allows to enable the approval buttons on the Customer Portal:
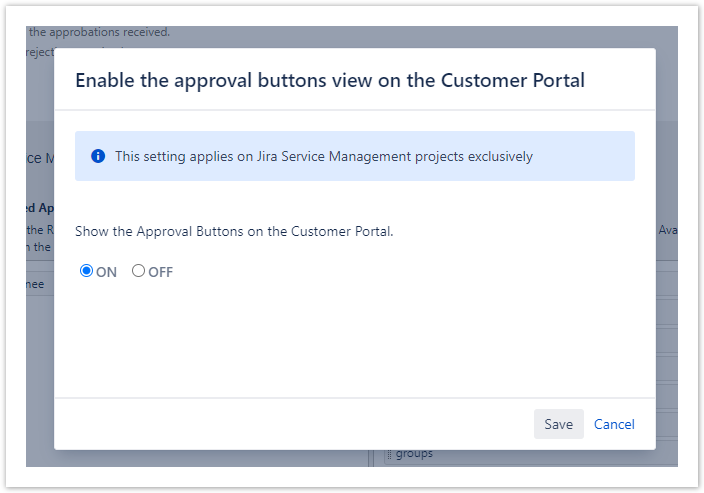
Example

Minimum Required approbations/rejections
You can setup the Minimum Required approbations and rejections conditioned or unconditioned rules to specify if the approval step can be considered approved or rejected based on subset of stakeholders reply.
Navigate on Minimum Required approbations and rejections page for further information and examples regarding this setting.